Wednesday 30 January 2013

Templar

Learning new art styles and experimenting provides quite a nice distraction.


Tuesday 29 January 2013

Detective 19

The PC I'm using to paint with isn't powerful enough to allow me to create the kind of  drawings I would normally make, so I'm having to come up with more 'graphic design' style things. I've never tried to make something like this before, so the entire thing was quite a learning experience. Fun though!


Sunday 27 January 2013

Self Reflection

Some sketches I was able to do this afternoon, Sunday sketches, if you will!


Annnndddd...I tried my hand at a webcomic of some description. When you're drawing something for half an hour, you don't recall whether you found the original idea funny or not anymore :/


The hardest part is choosing the layout. Having never made a comic before, it seems the presentation is an art in and of itself!


Friday 25 January 2013

Basic Perspective Pt.1


So..the creation of art begins with one simple thing, and that is perspective..


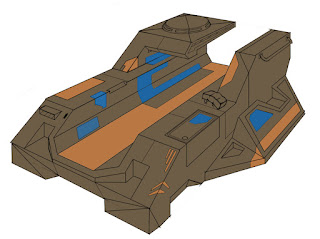
A vehicle created utilizing 2 point perspective

What is perspective? Well, perspective is our perception of one or several objects in space. Perspective tells us the distance, spatial relativity and dimensions of an object. If two people are viewing the same object or landscape, one with his face to the ground, and the other from a helicopter, both will see that object or landscape in an entirely different way. It is probably the absolute base foundation of good art, and while difficult to master, it thankfully follows some strict mathematic rules that once digested, will become second nature to you when calling upon it to create your art.

So let's look at the components of perspective..


4 hours in MSPaint that took..


This is our horizon line. Now there's something extremely interesting about this line, as no matter where we stand or place our 'camera' (visual camera that is, not necessarily a physical photo camera (though it can be that too ;)), as long as we face directly forwards, the horizon line will *ALWAYS BE AT EYE LEVEL*. Try it yourself, if you live in a place with a clear or roughly clear view of the horizon. If you stand outside your door, the horizon line will be at eye level.  If you then go up a high rise apartment building and look out your balcony, the same will occur. Since the horizon line will always be at exactly eye level (assuming you're not tilting your head or camera), then anything below the horizon line, you will be viewing the top of...and anything above it, you will be viewing the bottom side. Again, try this...look around your living room. Grab a cup or a DVD box and slowly move it around your field of vision, and observe what you see.

Now the majority of the time, the horizon line will not be directly visible, instead obscured by foliage or buildings. But in perspective drawing, the horizon line is essential for the next step.


4 and a half hours..


Now this dot here is what is known as the vanishing point. The vanishing point is the point at which things vanish (stay with me here :o). What we mean by this, is that at this dot, we can no longer see any further past the horizon. If we draw perspective lines outward from that point, we have our first type of perspective, 'one point' perspective.


These lines can be used as a grid, or could either represent a road, railway or a rigorously rigid river (good band name there). That doesn't matter. What does matter is that when held up to scrutiny, the perspective fits, and our brain will see the reality in that which we're trying to represent. After all, we're not creating our own rules of nature and getting our viewer to conform to them. Nature's rules are solid, and we all share the same perception of the world around us to one degree or another. Understand the rules of nature, and you're free to bend them to your whim.

So let's begin, the image below should provide a step by step towards creating a cube form within the dimensions of one point perspective.

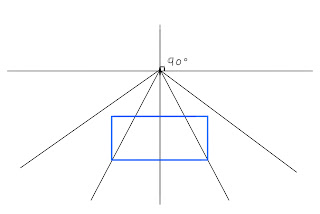
Draw a box, this will be the front side of your cube, and the plane (side) closest to us
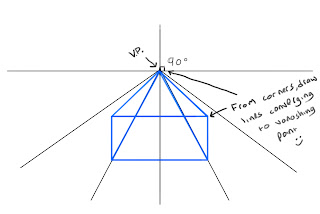
From each corner, draw a line to the vanishing point

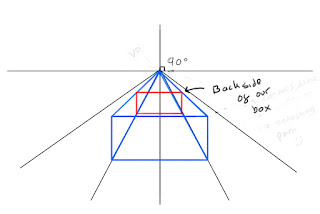
Now we're going to draw in the back side of our cube. Even though we couldn't see this in a finished render (unless we were drawing a see through material of course), drawing things in wireframe helps us to understand

Draw in the parts of the box we would see, and there we have a finished cube form in one point perspective


We can use the same process to draw in many more cubes, including the cube in the top right at an angle. Just keep the lines parallel


Once you've gotten the hang of that, the next step is to create a second vanishing point. This is shockingly know as 'two point perspective'. A general rule of thumb here is to place your points quite far apart from each other. Place them too close and you end up with some distortion problems.

Let's attempt something more difficult, but something that is really the first significant step in mastery of form. Let's construct a cube in 2 point perspective.

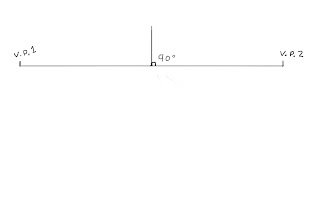
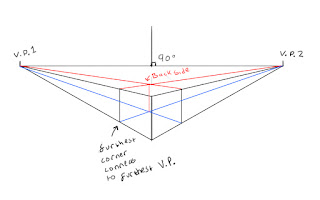
Add in your 2 vanishing points
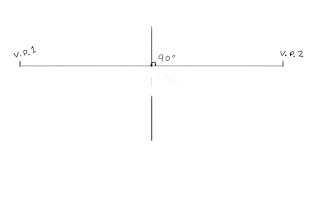
Draw a stick (sticks are going to be important later on, learn to love them)
From the top and bottom, draw lines to the V.P
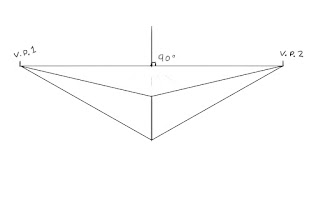
Close off the side planes of the box. It doesn't matter if you're making a cube or a cuboid, but for the sake of it, just stick with a cube for the time being
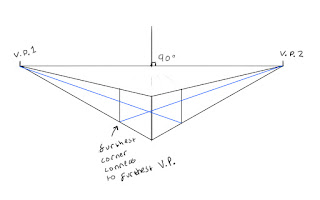
Now the back sides of our cube. Always think in wireframe at this point
Continue, now draw the lines to make up the top side of the cube
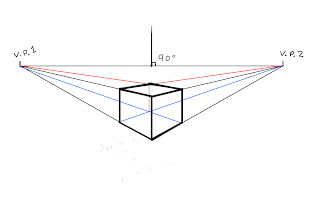
Go over the lines to bring out the visible planes of the cube

Now a good exercise here is to continue building cubes all over the page. Try placing one in front of the other, or one on top of another etc. Remember always that all parallel lines will converge to the same point in space. You can construct cubes on the same construction lines as another, up and down, but in order to have then appear parallel, they *must converge to the same point*. The more you do it, the more you will begin to understand how a cube would fit into any given perspective.


That's all for the moment. Some exercises will be presented in the next part. If anyone reading this would like to contribute their attempts, I'd love to see it and post some here. If there are any questions or any need for clarity on any given subject, don't hesitate to let me know! 

Wednesday 23 January 2013

Where to begin?


Art is large subject to take on. So, like anything, it's best to understand it at Its most basic and simple core before moving onto the more complex aspects. It could be argued that everything in art begins with the line. As children, we would draw flat illustrations of what we thought we could see, in it's most simple line art form. More a symbolic representation of the object or person we were drawing than an attempt at realism.


An adults (mine) attempt at a child's drawing :/


But really, in order to accurately portray something in a realistic, conceptual or expressive fashion, then form becomes the most important thing you can learn in order to understand how to draw or paint something. So then what is form?


The image above displays the most basic examples you can get of form. Every physical object is made up either of these shapes directly, or some kind of variation. The more complex the construction, the more variations and 'shapes on shapes' will be. But you can't understand something by diving headfirst in to it. By far the best approach is to learn to simplify something so that your brain can wrap it's head around it (er..that conjures up a disturbing image actually...), and understand it's shape in a 3 dimensional platform. Every object we can draw is made up of, or can be broken down into, basic forms. Let's see if we can find some examples...


Cubes make up the majority of our urban landscape. Other forms are in red.

The ribcage can be simplified into a box, while the hips resemble more of a trapezium. The legs and arms are obviously cylinders.

They're a little crudely drawn, but hopefully you get the idea. I'll go a little more in depth on this subject in the future, specifically in regards to anatomy and facial features. If we learn to simplify forms, we can better understand them and begin drawing from our heads. Even better, once you've mastered the basics of applying light and shadow to simple forms, that understanding can translate directly over to complex and realistic figures and objects, allowing you to visualize these goings on in your head and throw them directly onto the paper!

So now that we understand *WHY* we are learning something, next is to actually perform the exercises that will teach us how to draw. And since we're starting at the beginning, that will be basic perspective and learning to draw forms in perspective. And that will hopefully be my next tutorial blog post :) Thank you for reading!


All photos are taken from either wikipedia or character design. All drawings were done by me. The eye I painted was used from reference, with permission from DeviantArt user AFKBrandy. Thank you AFKBrandy :)


Monday 21 January 2013

Introduction to Painting


Imagine I showed you this painting of the Nightwatchmen by Rembrandt, and asked you to recreate it as accurately as you can, in whatever medium you choose.

Rembrandt

 Now if you're an advanced artist, just go along with me on this! But if you're an absolute beginner you would likely present me with a single exclamation..

"I wouldn't even know where to begin!"

Indeed! There is simply so much going on in the painting...from the mastery of the human figure to the understanding of light and shadow, to the symbolic use of colour and mastery of perspective..It's too much to take in all at once!

The learning of art can be treated in quite a linear fashion. If you can draw a line, you can construct a box. Once you've mastered the drawing of boxes, you can master other forms. Once there, you can turn those forms into objects. Know how to apply light and shadow to a cube? Congratulations! You're half way towards painting an urban landscape!

Caravaggio

Art is not a single gargantuan task to learn all at once. It is a series of small disciplines to master that will come together to form a coherent and competent image. Perspective will establish an objects location in space, value will establish it's light and environment, while colour will establish anything from mood to style etc.

Study encapsulating perspective, form, light and shadow

 If this seems overwhelming, it really doesn't need to be. Stick with it, and learn one single step at a time. That old adage of learning to walk before you can run applies perfectly here. Unfortunately many people treat art and the ability to create as something inaccessible, and something reserved for those born with a mystical gift of the ability to make art. To those people I say this..

The ability to draw is *not a talent*. It is not a birthright that some possess, and others don't. Like anything else, It is a skill to be learned, and not only is it an insult to tell someone who has never picked up a pencil that they will never gain the ability to create art, it's a disservice to a great and established artist to brush away the years of diligent study and sweat by attributing all that hard work to 'talent'. There are of course those few in any field whose abilities are so far above the norm that their sheer ability seems unreachable, but even they were not born with the abilities they possess. You could spend every day of your life training to be a runner, but that's no guarantee you'll be the next Usain Bolt. But even the most unfit individual with the right amount of dedication can become a great and inspirational athlete. And in some way, isn't that even more impressive? :)

John Singer Sargent

So, with the introduction out of the way, tomorrow I will be starting the first part of a series of tutorials on my way of drawing and painting, the first being an introduction to perspective and how to apply form drawing to real life. I've never attempted something like this before, and I like any other artist am still *far* from having mastered my subject, so any criticisms or comments are always welcome, along with any suggestions or contributions! And thank you for reading this far!

All images taken from ww.wikipedia.com

Saturday 19 January 2013

Cyberpunk

Rough sketch of a cyberpunk-esque brute type. I want to do more sci-fi characters, I see a lot of job postings for characters and kind of that nature, it's fun to do. I could sit around drawing futuristic weapons and armor all day.


Thursday 17 January 2013

A quick mock-up rough of some characters. Exploring some styles here and pallets. I like the idea of using some stylized perspectives, something like a platform game. It's fun to watch, as you can put in some cute little details here and there. When I was kid I used to love detailed little drawings and objects. I'd sit for hours looking at many of the encyclopedias I had on war or science fiction, and just observe all the little mechanical goings on. Where's Wally (Waldo in America isn't it?) would keep me occupied for DAYS!

Anyway, on with the painting!


Nordmen

Some roughs for a few little Viking fellows I'm sketching out for a possible children's book. They all have their own little personalities and motivations which I'm trying to get across in their design. Shape is an obvious one, but there's a few little details too that can be important. A character that's aggressive and mean will lean towards the sharper and larger end of the spectrum, but then how do you get across a tough and aggressive character who is one of the most good-natured of the good guys? It's a fun challenge to figure out!


Artistic Study Tutorial: Part 1

Thank you for taking the time to check out part one of my tutorial. Whether you're a beginner or advanced artist, I sincerely hope that ...